Within Teledentix, you are able to create your own custom patient forms and assign them to patients.
In order to create your own custom forms:
- Select "Manage Account" from the left-hand side dashboard list.
- Select "Setup" from the drop-down list.
- Select "Forms" from the drop-down sub-list.
- Click the "Add Forms" button in the top right-hand corner of the page.
- On the "Create Form" page, you are able to drag and drop your desired components to create your form fields.
- There are five tabs that categorize the different components: Basic Components, Advanced, Layout, Data, and Linked Fields.
- Basic Components include simple open ended components, for example: text fields, number inputs, and select boxes components.
- Advanced components include more detailed and restricted input components, for example: email address, phone number, and HTML element.
- Note: the HTML element allows you to write custom HTML directly into your component.
- Layout components allow you to create a layout for the form. Using the layout components, you can arrange your basic and advanced input components in a multitude of different ways.
- Data components allow users to input their own data and data sets, arranged by the varying data components.
- Linked Fields pull the user entered information from component and into the patient or responsible party's Teledentix profile and account.
- Please note: When adding in the Linked Fields for addresses (Country, State, City, Zipcode), you must include all fields. The smaller geographic field picklists are set by the selection made in the larger geographic field. (For example, the State picklist is set by the Country selection - U.S. vs U.K.).
- Components also allow you to create Conditionals to view/hide the component itself based on the response to a previous component.
- For example, if we want the email input component to only appear when the patient answers yes to the earlier component, "Do you have an email address? Yes/No", then our email component conditional should be set up like this:
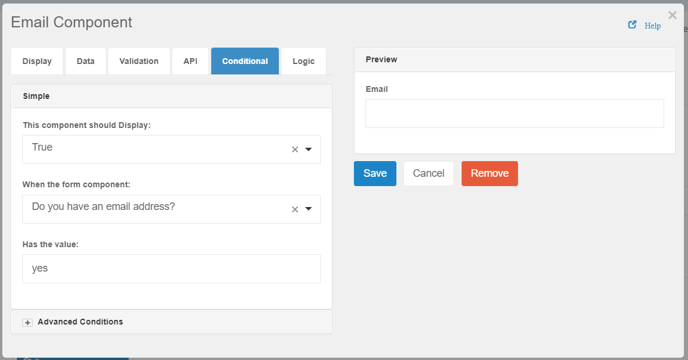
- Note: you will need to edit the conditional on the component you wish to view/hide, not the controlling component.
- There are five tabs that categorize the different components: Basic Components, Advanced, Layout, Data, and Linked Fields.
- Click the "Save" button in the bottom right-hand corner of the screen to save your form.
- After saving and submitting, you are able to access your newly created form on the "Manage Forms" page.
- Please note: you will still need to assign the form to the appropriate office on the "All Forms" page before you are able to assign out the form.
- Manage and Assign Patient Forms