If you want to add a personal touch to your patient or administration email notifications, you are able to create and edit custom email templates in the Teledentix Email & SMS Editor.
This feature is available for both provider accounts and administrator accounts. Administrator accounts are able to create custom emails for their entire administration, whereas provider accounts are able to create custom emails specific to an office or location.
Teledentix comes with multiple default email templates and an SMS notification template as well. Below, you will learn how to go about building your own custom emails and SMS notifications from these templates.
Create Custom Templates
To create custom templates from the Admin account:- Navigate to Email & SMS Editor from the vertical dashboard list.
- Select the desired template that you wish to customize and select "Create".
- The HTML email template editor will open or the SMS editor will open. See below section Edit Email Templates for more information on how to use the template editor.
- Be mindful to save your template after you have finished editing.
- The Admin account has access to all the base templates. Using the "Create" button will create the template using the existing notification triggers. The custom email template will then be in effect for the entire enterprise (all offices).
- Only the Admin account will have the ability to edit and delete the Admin's custom created emails.
To create custom templates from the Provider accounts:
- Select "Manage Account" from the vertical dashboard list.
- Select "Email & SMS Editor"
- Find the desired email templated and select "Create for Office." A pop-up window will appear with a list of offices owned by the provider account.
- Select the desired office in the pop-up. After confirming, select the office from the office dropdown picklist at the top of the page.
- The email/SMS will now be in place for that office location and is able to be edited from the provider's account.
- When a specific office is selected on the top right, the will see only the list of emails already created for that office.
- Please note: The top right office selection includes not only the offices owned by the provider but also the offices the provider is associated with. While provider will be able to view the list of emails of their associated offices too, they will not be able to edit/delete them. However, the provider account will still have the ability to create a copy of that template for any office he owns through the Create for office button.
Edit Email Templates
Please note: Only the account that created an email template will have the ability to modify/delete it.
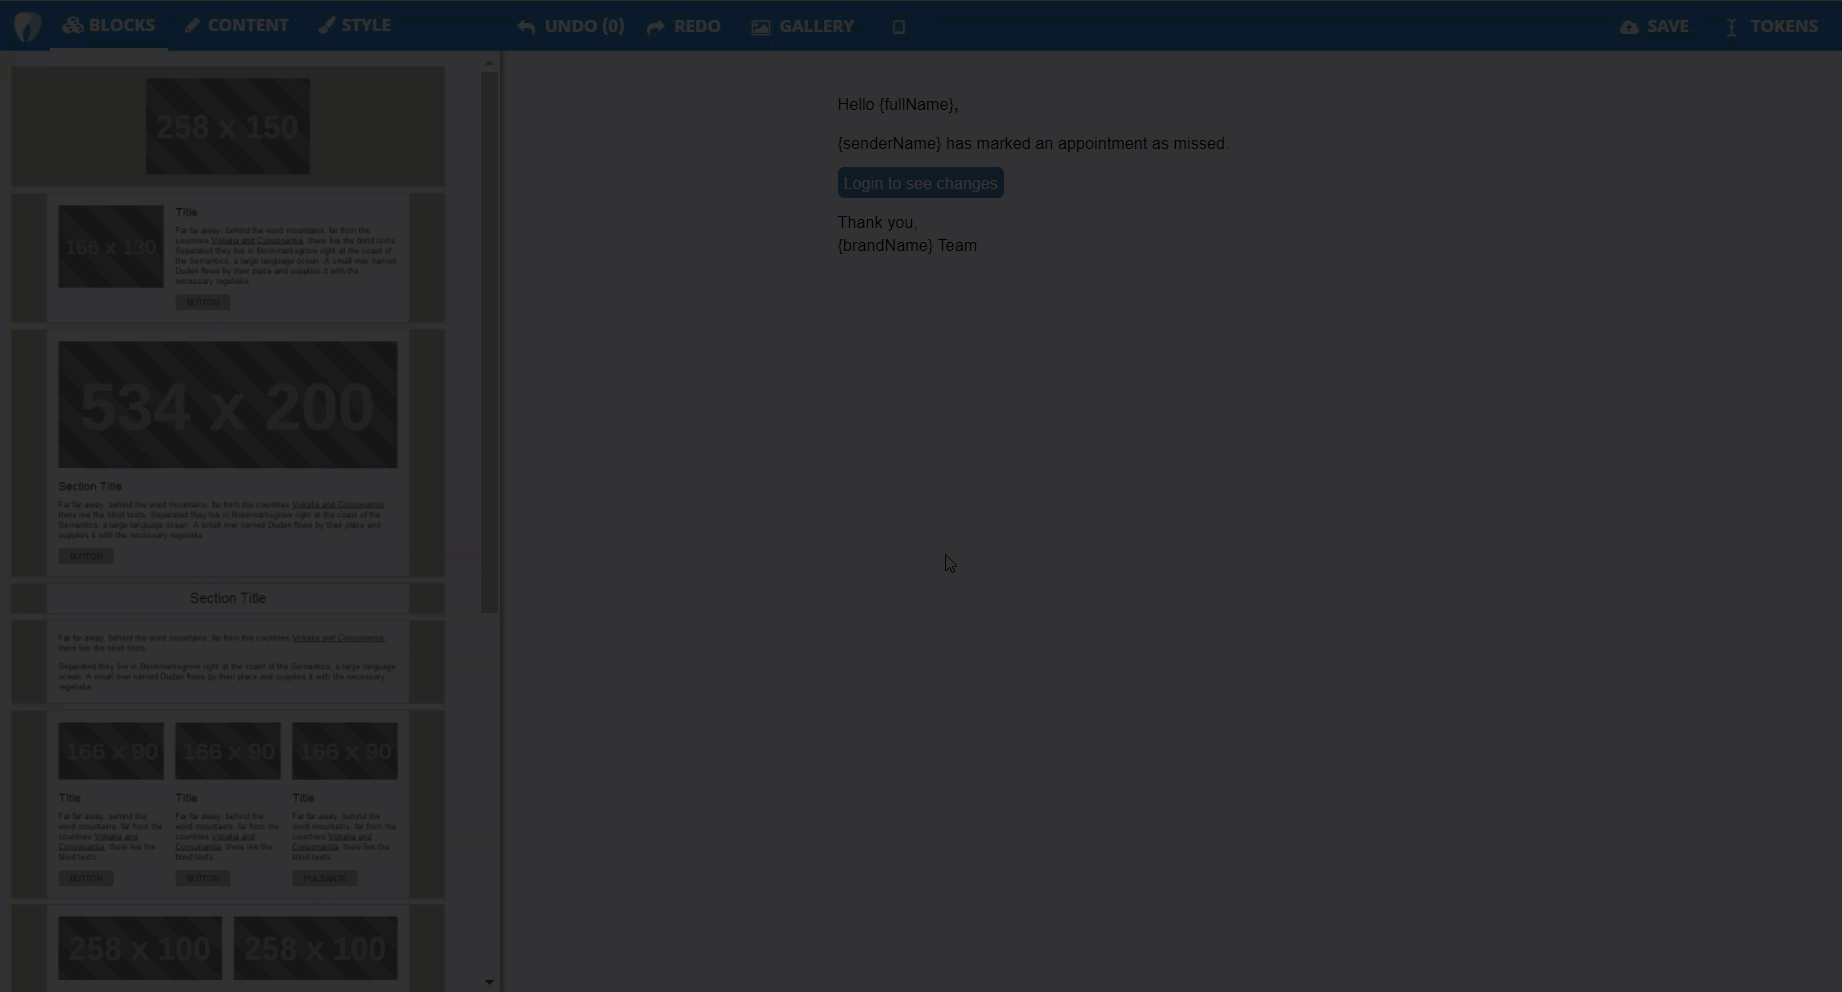
- Clicking the "Edit Body" button will open the HTML editor.
- The HTML editor features a drag and drop action allowing you to pick content blocks and drop them into your custom email template.
- By clicking an individual block, you are able to edit the content and style of that block by selecting the "Content" or "Style" selections on the top left hand side of the page.
- The HTML editor also features "Tokens." They allow for patient specific information to be inserted into the email based on the patient's account. Clicking on the desired token will copy the token to your clip board, then you are able to insert it into a content block by pasting it from your clipboard.
- Delete button will delete the template.
- Edit Details button will open a pop up for the following:
- Custom Subject: This is optional. Adding custom email subject will send that as the email subject instead of the system generated one.
- Active Checkbox: This will be checked by default. If this checkbox is unchecked, the email template will go to inactive state and will not be in-effect. This can be done to make a template temporarily inactive instead of having to delete it entirely.
- Frequency: This is currently supported for only one reminder email that is supported in editable emails. That is the "Appointment reminder email for patient". Adding frequency using the Add Frequency button will add a frequency option where user can choose between varied amounts of hour/day/month. User can choose multiple frequency options. Please note that month will be treated as 30 days in general.
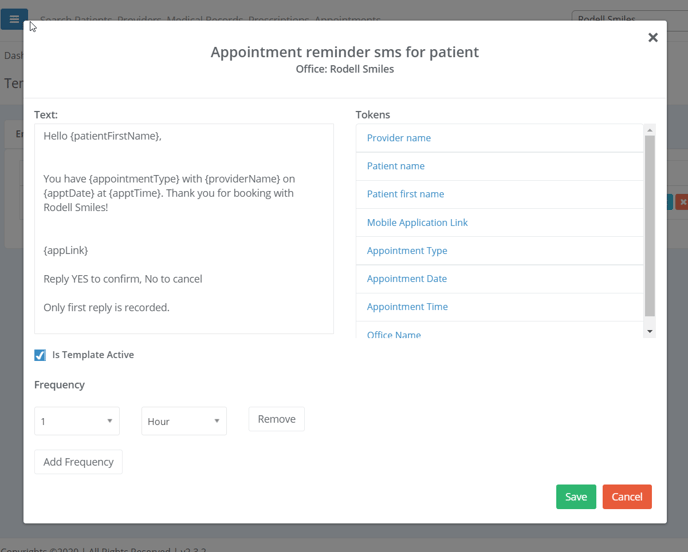
Edit SMS Templates
- Clicking the "Edit" button opens up the SMS editor
- Active Checkbox: This will be checked by default. If this checkbox is unchecked, the SMS template will go to inactive state and will not be in-effect. This can be done to make a template temporarily inactive instead of having to delete it entirely.
- Frequency: Adding frequency using the Add Frequency button will add a frequency option where user can choose between varied amounts of hour/day/month. User can choose multiple frequency options. Please note that month will be treated as 30 days in general.
- The SMS editor also features "Tokens." They allow for patient specific information to be inserted into the email based on the patient's account. Clicking on the desired token will copy the token to your clip board, then you are able to insert it into a content block by pasting it from your clipboard.